Lighting plot & blocking diagram software
Block it, light it,
hand it over.
Draw a lighting plot and blocking diagram for film and TV, in your browser, and export a PDF the crew can read.
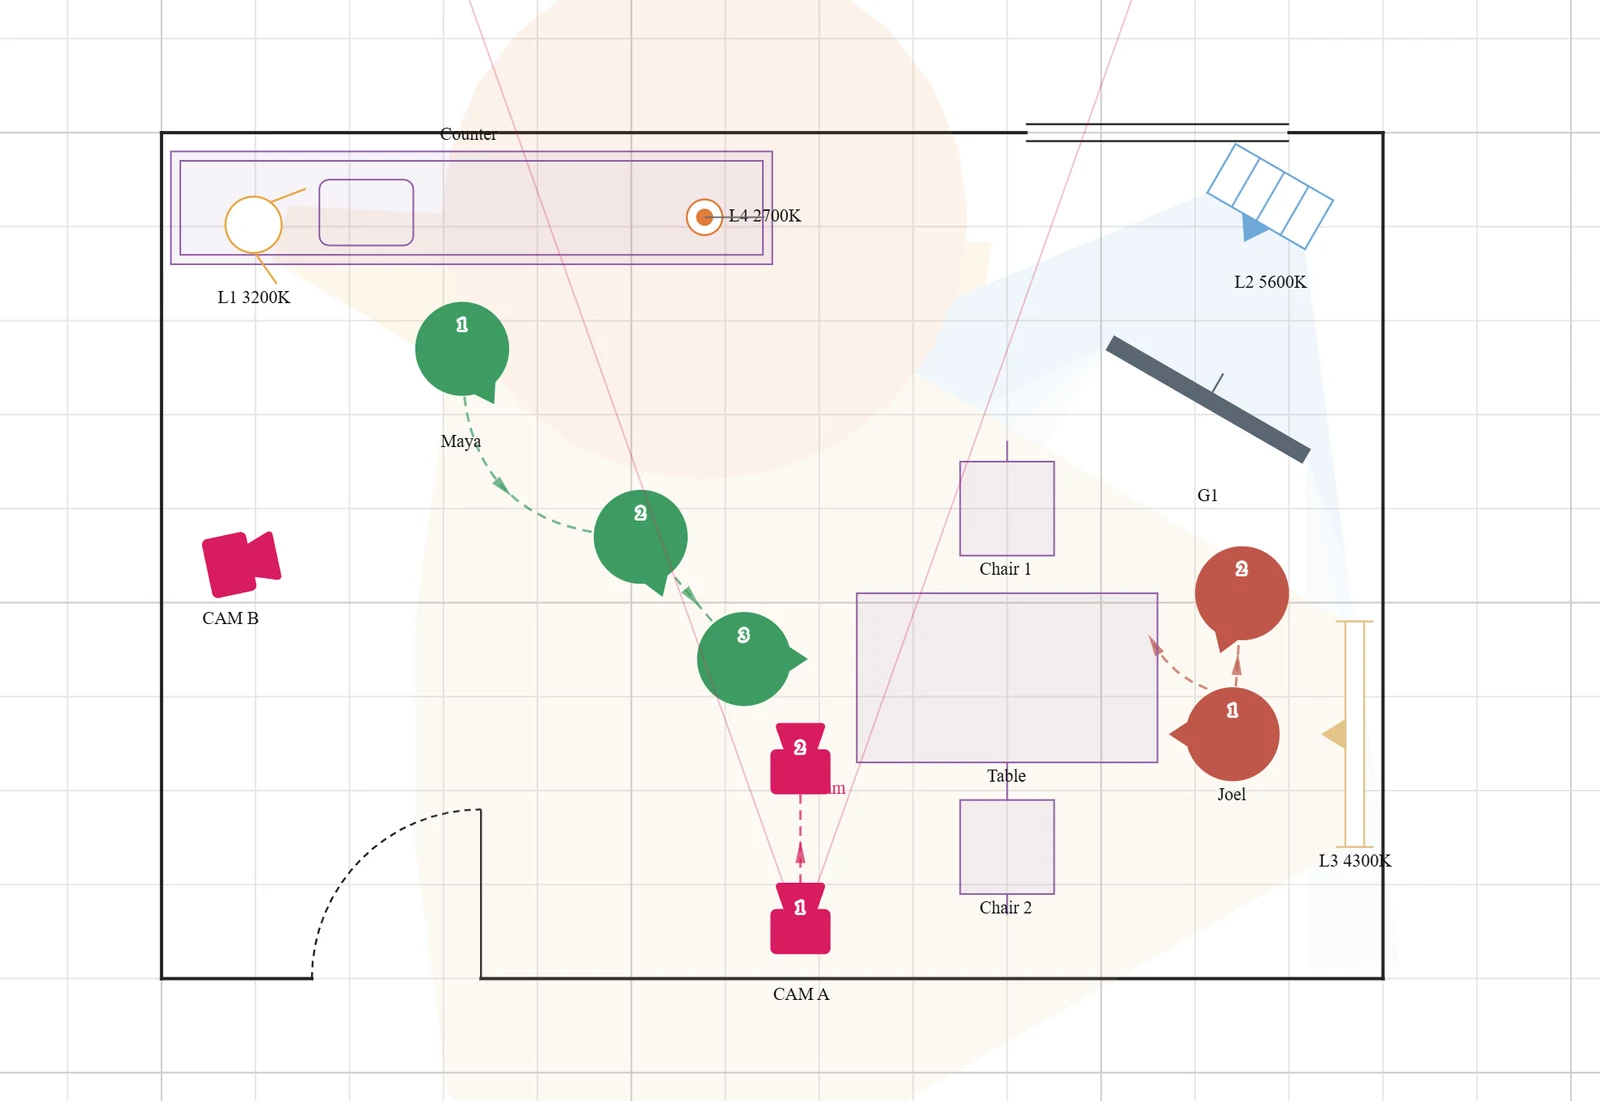
A director blocks the scene. A DP drops the cameras. A gaffer changes the rig. All on one page, to scale. Then out as a PDF the crew can read on set without you standing over them.
Try it free Read the PDF it makes
Free to draw with · No account
Nothing to install · Offline once installed
$19 once unlocks clean, whole-project export
Start here, because this is the only part that leaves your screen. It is a real export, not a picture of one: one A4 page, pure vector, with the room dimensioned, a key that lists every object, and a scale bar. It comes from the free version, so the small footer line the licence removes is there too. Zoom in, select the text, download it.
Fixture names, trim heights and colour temperatures are on the page: ARRI 650 Fresnel · 2.4 m · 3200 K, so a spark can pull the right units off the truck before walking into the room.
The director
You are working out the scene the night before. Where does she stand when she says it, where does he go, and does the room even allow the move you have in your head.
You do not want a lighting package. You want a rectangle, two dots and a line between them, fast.
Draws the room · drops the actors · marks the movesThe DP
You open the director's file and put the cameras where they actually go. The cone tells you whether the 24 mm clears the doorway and what falls in frame behind them.
You add the key, the fill and the edge, and now the plan says something about the picture.
Places cameras & lenses · sets the key · sizes the throwThe gaffer
You get a page with fixture names, heights, colour temperatures and a schedule: enough to pull the right units off the truck before you walk into the room.
Want the key two feet left and a flag on the back wall? Open the same file and move it. Editing is free for everyone, forever.
Reads the PDF · swaps fixtures · flags the spillThe plan changes, the page follows
Move a light, a wall or an actor and the whole drawing stays to scale. On a printed template you rub out and start again.
The key writes itself
Every fixture, camera, actor and prop is listed on the printed page with its name, height and colour temperature. Nobody types a schedule.
Real sizes, not guesses
A 1.6 m table is 1.6 m. The PDF carries room dimensions and a scale bar, so a gaffer can measure straight from it.
A printed grid and a pencil is a fair answer for one simple scene. Here is exactly where it stops working.
-
1
The room, and the ways into it
One ordered wall outline, not loose lines, so the shape stays honest. Cut in doors, windows and plain gaps: the door swings into shot, the window is where the daylight comes from.
-
2
Fixtures with names, not dots
Thirteen symbols in all: eleven fixture types, a generic light for before you have decided, and the sun. Each is drawn as the top-down shape of that kind of unit at its real size. Type the actual model yourself and it prints in the schedule with its height.
- Generic
- Open face
- Fresnel
- PAR
- Profile
- Panel
- Tube
- Softbox
- China ball
- Space light
- Ring light
- Practical
- Sun
-
3
Colour temperature, per unit
Each lamp tints to its Kelvin value and prints the number. This plan runs four at once: 3200K key, 5600K daylight, a 4300K tube, a 2700K practical. So the mixed-source problem shows up before you are standing in it.
-
4
Throw from the whole light
A light throws from its whole emitting face, so a four-foot tube spills from its full length rather than a point. The wash is a flat tint, because it is a guide, not a photometric claim.
-
5
Grip that actually does something
G1 is a flag, and the beam behind it is genuinely gone: not a symbol sitting on top of the light. Silks and nets spread the beam instead of removing it.
-
6
Blocking, on the lighting plan
Maya crosses three marks; Joel moves once and turns. Each later position is drawn solid and numbered, joined by a dashed path that can bow around a table. Same page as the lights on purpose, that is how you spot an actor crossing their own key.
-
7
The camera's actual angle
Pick a lens and the cone matches it for your sensor. Swap 35 mm for 24 mm and it opens up while you are still at a desk. Cameras carry blocking too, so a push-in is a mark, not a margin note.
-
8
Furniture at real size
Twenty-three named interior pieces (sofas, stairs, kitchen counters, a bath and shower), eleven exterior, and seven plain shapes plus a free-form custom box for whatever nothing fits. A 1.6 m table is 1.6 m, the only way "can the camera get behind it" is answerable on paper.
The bar this was built to
Somebody who has never seen it draws a room, a camera, three lights and two actors and exports a PDF: under five minutes, nothing to read first. Every feature is judged against that sentence; anything that slows it down gets cut.
- 01Drag the roomOne drag, with a live width-by-height readout.
- 02Click in the cameraOne click. Pick a lens; the cone matches it for your sensor.
- 03Pick the real fixturesThirteen symbols to choose from. Leave one generic, or name the actual unit.
- 04Drop the actorsOne click each, own colour. Blocking mode adds numbered marks.
- 05ExportOne scene or the project. A4, A3 or US Letter, landscape or portrait, as a vector PDF or a PNG picture.


Every object, listed
The Key panel is the plan's schedule. Each row carries the name, lens or fixture and height, with a toggle for its cone or throw. Drag a row to reorder it, and the printed key follows the same order.
Click a thing, get its controls
Name, model, gel, height, colour temperature, throw shape and angle, all in one panel on the object you clicked. Rename, duplicate and delete sit in the same panel, and every change can be undone.
One key per tool
Each tool has a single-letter shortcut, shown beside it in the tool column, so drawing stays fast once you know where things are.
How to draw a lighting plot
What has to be on it for a gaffer to rig from, with a worked kitchen example.
Lighting plot symbols explained
What each fixture is, and how to draw it so a crew can read it.
Camera angle of view on a plan
The formula, a table of common lenses, and how to draw the cone.
All twelve guides, from blocking diagrams to a location recce checklist.
Drawing is free and always will be. Every fixture type, blocking, furniture, grip, as many scenes as you like, saving and opening files; no limits, no clock. Free exports go one scene at a time and carry a small watermark in the bottom margin, beside the drawing, never across it.
$19 USD, once, drops the watermark and lets you export the whole project as one paginated PDF, on every machine you work on. No account, no renewal, nothing of yours stored anywhere. See what is in each.